Clipboard History
That Works for You
CopyQ saves everything you copy and lets you search, edit, and organize it across tabs. Works on Windows, macOS, and Linux.
System Requirements
CopyQ is lightweight and runs on most hardware without trouble. Here is what you need to get started on each platform.
| Component | Minimum | Recommended |
|---|---|---|
| Operating System | Windows 7 SP1, macOS 10.15 Catalina, or Ubuntu 20.04 / Debian 11 | Windows 10/11, macOS 12 Monterey or later, Ubuntu 22.04+ / Fedora 38+ |
| Processor (CPU) | 1 GHz single-core (x86_64) | 2 GHz dual-core or faster |
| RAM | 512 MB available | 2 GB or more for large clipboard histories |
| Disk Space | 50 MB for installation | 200 MB+ (clipboard data grows with stored images and files) |
| Display | 1024 × 768 resolution | 1920 × 1080 or higher |
| Dependencies | Qt 6 runtime (bundled on Windows/macOS) | Qt 6, xclip or xsel on X11, wl-clipboard on Wayland |
| Internet | Not required (offline app) | Only needed for downloading updates from GitHub |
CopyQ v13.0.0 is built on Qt 6 and ships as an 18.4 MB installer on Windows. Linux users can install through their distro package manager (apt, pacman, dnf) or grab the AppImage from GitHub Releases.
What Is CopyQ?
A clipboard manager built for people who copy and paste dozens of times a day and lose track of what they had five minutes ago.
CopyQ is a free, open-source clipboard manager that keeps a running history of everything you copy — text, images, HTML, URLs, code snippets, and custom formats. Instead of your clipboard holding just one item at a time, CopyQ stores hundreds (or thousands) and lets you search, edit, and reuse any of them on demand.
The app was created by Lukas Holecek and has been actively maintained on GitHub since its early releases. It runs on Windows, macOS, and Linux, which makes it one of the few clipboard tools that works the same way across all three platforms. The current release is version 13.0.0.
Who actually needs this?
If you copy-paste more than a handful of times per day, CopyQ pays for itself almost immediately. Developers use it to juggle code fragments, API keys, and terminal output. Writers keep research quotes and reference links in separate tabs. Support staff pull up canned responses without digging through documents. The scripting engine alone sets CopyQ apart from simpler alternatives like Ditto or ClipClip — you can write custom actions that transform, filter, or route clipboard items automatically.
Highlights worth knowing
- Search your full clipboard history instantly. Type a few characters and CopyQ filters to matching items, no matter how old they are.
- Organize items into named tabs. Keep work stuff separate from personal snippets, or group by project.
- Built-in scripting engine with a JavaScript-like syntax. Automate repetitive clipboard tasks or trigger actions on specific content types.
- Global keyboard shortcuts and a command-line interface. Access your history without touching the mouse or integrate CopyQ into shell scripts.
CopyQ is licensed under GPLv3, so it is completely free with no ads, no trials, and no feature gates. The source code is on GitHub for anyone to inspect or contribute to. It is a small download (around 18 MB on Windows) and runs quietly in the system tray until you need it.
Ready to try it? Download CopyQ or jump to the Getting Started guide.
Key Features
CopyQ does a lot more than store what you copy. These are the features that set it apart from simpler clipboard tools.
Unlimited Clipboard History
Everything you copy gets stored automatically – text, images, HTML, all of it. There is no cap on how many items CopyQ keeps. Need something you copied three days ago? Just scroll back or search for it.
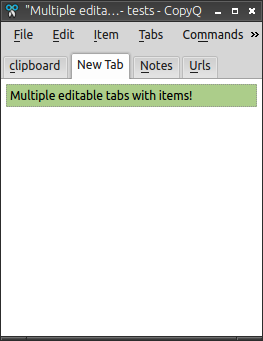
Tabbed Organization
Sort clipboard items into custom tabs like “Work,” “Code,” or “Links.” Drag and drop entries between tabs to keep things organized. Each tab functions as its own clipboard with independent history and search.
Instant Search and Filter
Start typing and CopyQ filters your clipboard history in real time. It highlights matched text so you can spot the right entry fast, even across hundreds of stored items. Regex search is available for more precise matching.
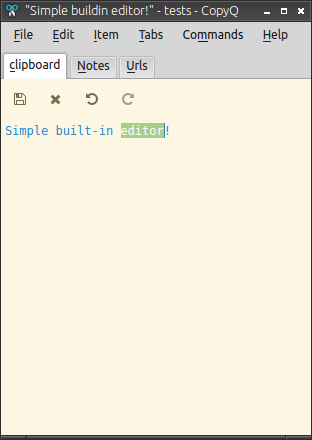
Built-in Text Editor
Double-click any clipboard item to open it in CopyQ’s built-in editor. Fix typos, reformat content, or combine multiple entries before pasting them. The editor supports plain text and rich text editing.
Custom Scripting Engine
CopyQ has its own scripting language (JavaScript-style) for automating clipboard actions. You can trigger scripts on copy, on paste, or on custom events. People use this to auto-format text, strip tracking parameters from URLs, or run multi-step transformations without manual work.
Global Keyboard Shortcuts
Assign system-wide hotkeys to open CopyQ, paste specific items, or trigger custom commands. These shortcuts work from any application. Configure them through the preferences panel without editing config files.
Command-Line Interface
CopyQ has a full CLI. You can read, write, and manipulate clipboard content straight from the terminal. Pipe shell output into your clipboard history, chain CopyQ commands in bash scripts, or hook it into whatever automation you already have running.
Multi-Format Support
Store text, images, HTML, URLs, and custom MIME types side by side. CopyQ preserves the original format of each item, so pasting rich content into a compatible app retains all formatting. Even binary data and screenshots get saved.
Customizable Appearance
Light theme, dark theme, or something custom. CopyQ lets you adjust colors, fonts, and window transparency. It ships with built-in themes, but you can also write your own using CSS-like stylesheets if the defaults do not fit.
Item Notes and Tagging
Attach notes to any clipboard entry for extra context. Tag items so you can group and filter them later. This turns CopyQ into a lightweight snippet manager alongside its clipboard duties.
Directory Sync
Point CopyQ at a shared folder (Dropbox, Google Drive, or a network drive) and your clipboard items sync across machines. This works without a cloud account or proprietary service – just a folder both devices can access.
Cross-Platform
CopyQ runs on Windows 7 through 11, macOS 10.15 and later, and most major Linux distributions. The same interface and feature set across all platforms means you do not have to relearn anything when switching operating systems.
Download CopyQ
Get the latest version of CopyQ for your operating system. All downloads come directly from the official GitHub repository.
CopyQ v13.0.0
Windows Installer · 18.4 MB
Prefer portable? Download the ZIP version (24.4 MB)
Works on Windows 7, 8, 10, and 11. The installer adds a Start Menu shortcut and optional auto-start on login.
Separate builds for Apple Silicon (M1/M2/M3/M4) and Intel Macs. Requires macOS 12 or later.
Available as .deb packages for Debian-based distros and .rpm for openSUSE. Also in Flathub and Snap Store.
Need the source code? Download source tarball (3.4 MB) · Verify checksums · View release notes
CopyQ in Action
See how CopyQ organizes your clipboard history with tabs, search, and a built-in editor across Windows, macOS, and Linux.


Screenshots from the official CopyQ project. Click any image to enlarge.
Getting Started with CopyQ
From download to your first organized clipboard in about five minutes. Here is everything you need to get CopyQ running on your machine.
Head to our download section above to grab the latest version of CopyQ (v13.0.0 as of this writing). The Windows installer is about 18.4 MB, so the download finishes in seconds on most connections. A portable ZIP version is also available at 24.4 MB if you prefer not to install anything.
For Windows, you have two options: the .exe installer and the portable .zip. The installer is the simpler choice for most people. It puts CopyQ in your Program Files folder and adds a Start Menu shortcut. The portable version runs from any folder (or a USB drive) without touching your system. Pick that one if you work across multiple machines or want to keep things self-contained.
On macOS, the easiest path is Homebrew:
On Linux, CopyQ is in most package managers. Ubuntu and Debian users can add the official PPA:
sudo apt update && sudo apt install copyq
Fedora users can run sudo dnf install copyq, and Arch has it in the community repos. There is also a Flatpak on Flathub for other distributions.
Windows
Run the downloaded copyq-13.0.0-setup.exe file. The installer is straightforward and doesn’t bundle any extra software or toolbars.
- Accept the license agreement (GPLv3). This is a standard open-source license.
- Choose the installation directory. The default (
C:Program FilesCopyQ) works fine for most setups. - Select whether to create a desktop shortcut and a Start Menu folder. Both are checked by default.
- Click Install. The process takes a few seconds.
- On the final screen, check “Launch CopyQ” if you want to start using it right away.
For a silent install (useful for IT deployments), run the installer from the command line:
macOS
After installing via Homebrew, open CopyQ from your Applications folder. macOS may block it on first launch since the app is not notarized. If that happens, open Terminal and run:
codesign –force –deep –sign – /Applications/CopyQ.app
After that, CopyQ opens normally. You will see its icon appear in the menu bar at the top-right of your screen.
Linux
If you installed from the PPA or your distro’s repos, CopyQ is ready to go. Type copyq in your terminal or find it in your application launcher. On Wayland-based desktops (GNOME 44+, KDE Plasma 5.27+), CopyQ handles clipboard access through the appropriate protocols automatically. X11 sessions work out of the box.
First launch
When CopyQ starts, it minimizes straight to your system tray. There is no splash screen or registration step. The app just quietly starts monitoring your clipboard in the background. Click the tray icon (or press the global shortcut, if you set one) to see the main window.
Open CopyQ’s preferences by clicking File > Preferences in the main window (or right-click the tray icon and select Preferences). The configuration dialog has several tabs on the left side.
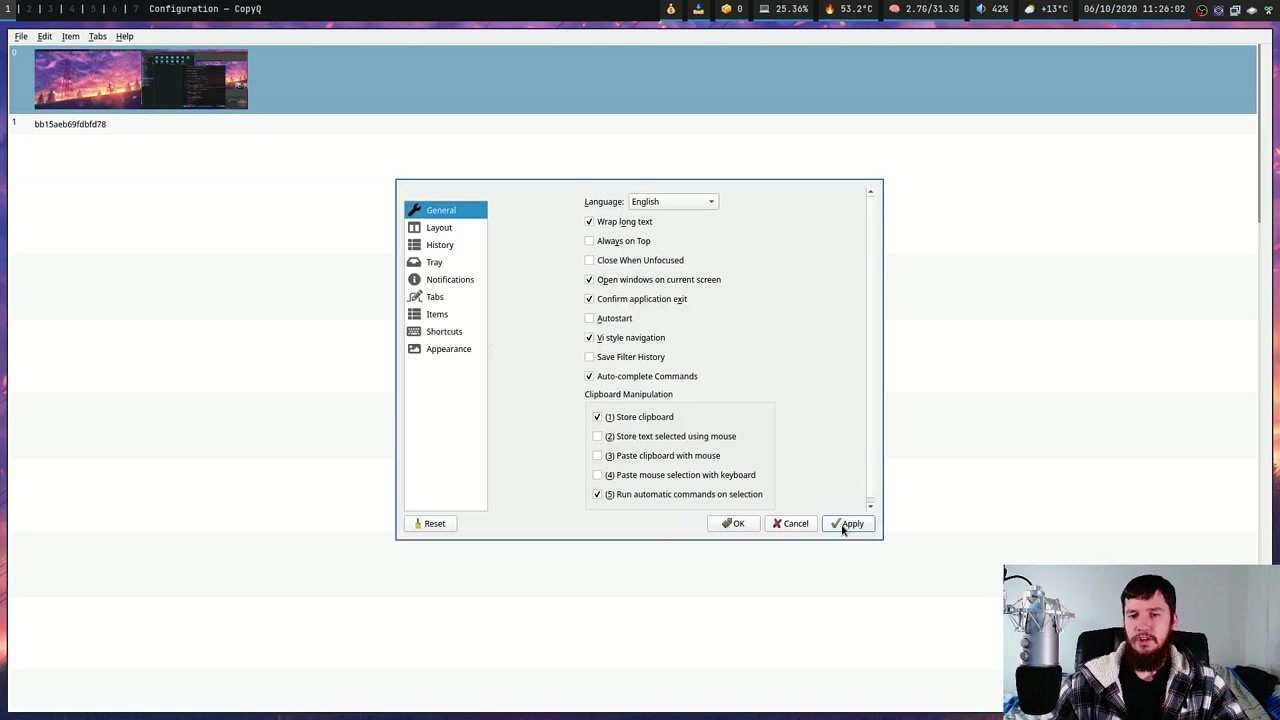
General tab
This is where the most important first-run settings live:
- Autostart – Check this box so CopyQ launches when you log in. Otherwise, you have to start it manually each time.
- Language – Defaults to English. CopyQ supports dozens of languages through this dropdown.
- Store clipboard – Should be checked. This is the core feature. If unchecked, CopyQ watches the clipboard but doesn’t save anything.
- Confirm application exit – Worth keeping enabled so you don’t accidentally close CopyQ when you meant to close the main window.
History tab
Set the Maximum number of items to store. The default is 200, but you can push it much higher. I have mine set to 2000 and haven’t noticed any slowdown. Also set the Maximum item size in bytes if you copy a lot of images. The default 10 MB is usually enough.
Items tab
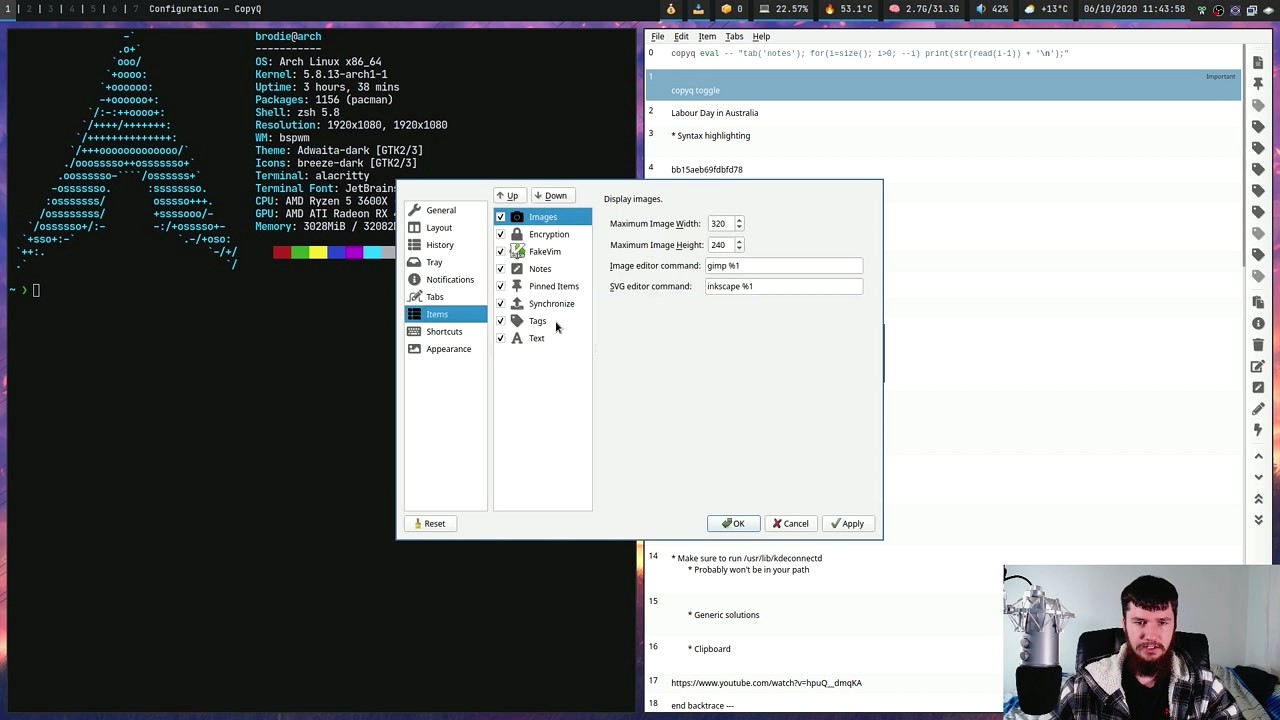
Under the Images section, you can set the maximum display width and height for image previews. This keeps large screenshots from stretching the history list. Set it to something like 320×200 pixels for a good balance between visibility and list density.
Click Apply and then OK to save your changes.
Here is a concrete example of how CopyQ fits into actual work. Say you are researching a topic and need to pull quotes from three different web pages, a code snippet, and a screenshot.
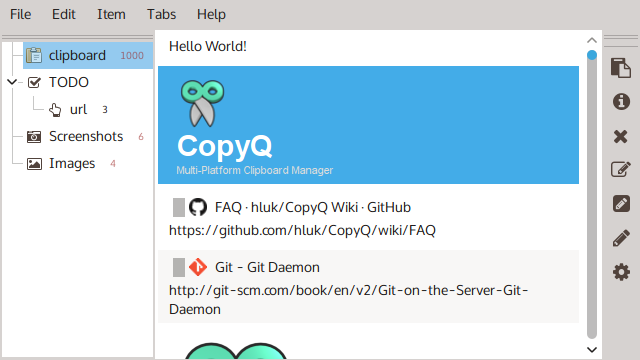
Open CopyQ’s main window by clicking its tray icon (or pressing your global shortcut). You will see a vertical list of everything you have copied, newest items at the top. Each item shows a preview of the content and a small icon indicating the type: text, URL, image, or HTML.

Copy your research material as you normally would. Switch between browser tabs, copy text, grab that code snippet, take a screenshot. CopyQ captures all of it automatically. When you are ready to use something you copied earlier, open the CopyQ window, find the item, and either double-click it or press Enter. That item gets pasted into whatever app you have open.
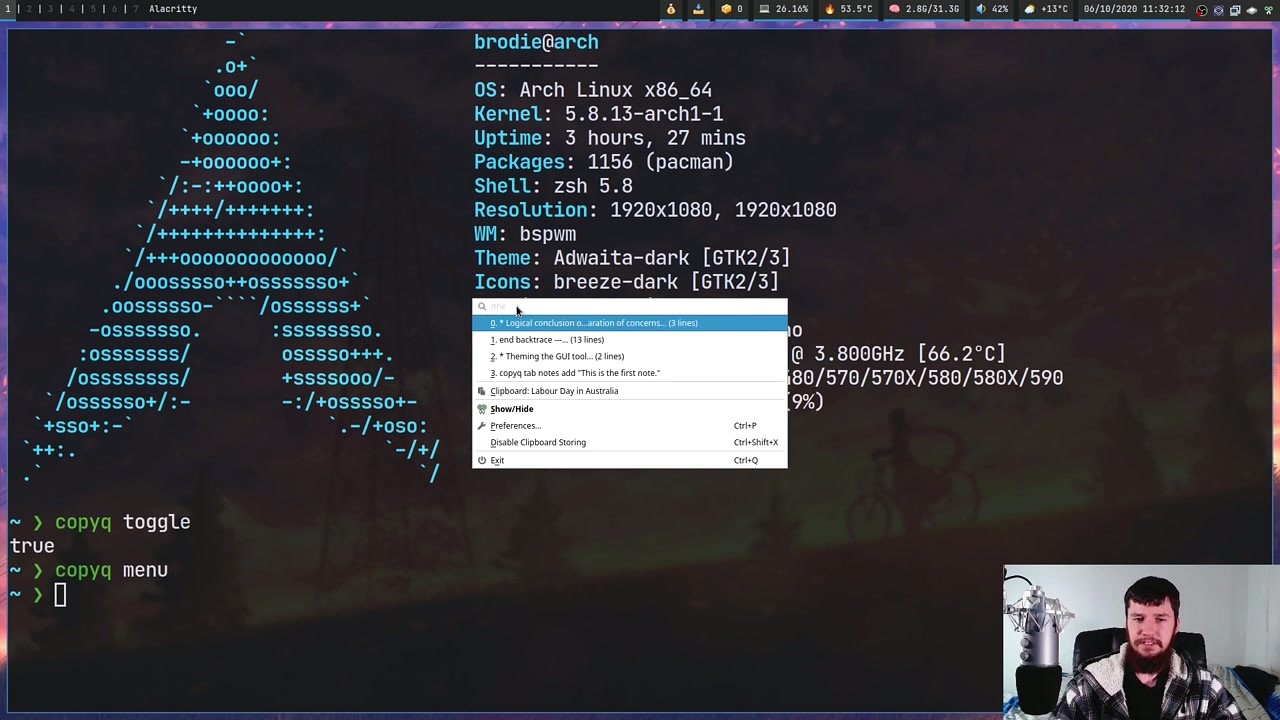
You can also right-click the tray icon for a quick popup menu of recent items without opening the full window.
Organizing with tabs
Tabs are one of CopyQ’s best features. Create a new tab by going to Tabs > New Tab (or press Ctrl+T). Name it something like “Code Snippets” or “Project Notes.” Then drag items from your main Clipboard tab into the new tab to organize them. You can switch between tabs with the Left/Right arrow keys or Ctrl+Tab.
Searching your history
Just start typing in the main window. CopyQ filters the list in real time. If you copied a URL two days ago and can only remember part of it, type a few characters and the matched items appear instantly. Press Enter on the one you want.
Editing clipboard items
Select any text item and press F2 to open it in CopyQ’s built-in editor. Fix a typo, trim whitespace, or reformat the text. Press F2 again to save. This is surprisingly handy when you copy something that has unwanted formatting or trailing spaces.
Keyboard shortcuts
| Action | Shortcut |
|---|---|
| Show/hide main window | Ctrl+Shift+V (custom) |
| Paste selected item | Enter |
| Edit item | F2 |
| Create new item | Ctrl+N |
| Delete item | Delete |
| Move item up/down | Ctrl+Up / Ctrl+Down |
| Switch tabs | Ctrl+Tab |
| New tab | Ctrl+T |
| Search/filter | Just start typing |
Ctrl+Shift+V or Super+V. This lets you pull up your clipboard history from any application without reaching for the mouse.
Performance
If CopyQ feels sluggish after accumulating thousands of items, lower the history limit in Preferences > History. Around 500-1000 items is a reasonable sweet spot. Also reduce the maximum image preview size under Items > Images if you copy a lot of screenshots.
Common beginner mistakes
- Closing the main window and thinking CopyQ has stopped. It hasn’t. CopyQ keeps running in the system tray. To actually quit, right-click the tray icon and select Exit.
- Forgetting to enable Autostart. Without it, CopyQ only runs when you manually open it. Head to Preferences > General and check the Autostart box.
- Not setting a global shortcut. Without one, you need to click the tray icon every time. A keyboard shortcut makes the difference between using CopyQ occasionally and using it constantly.
Power-user features most people miss
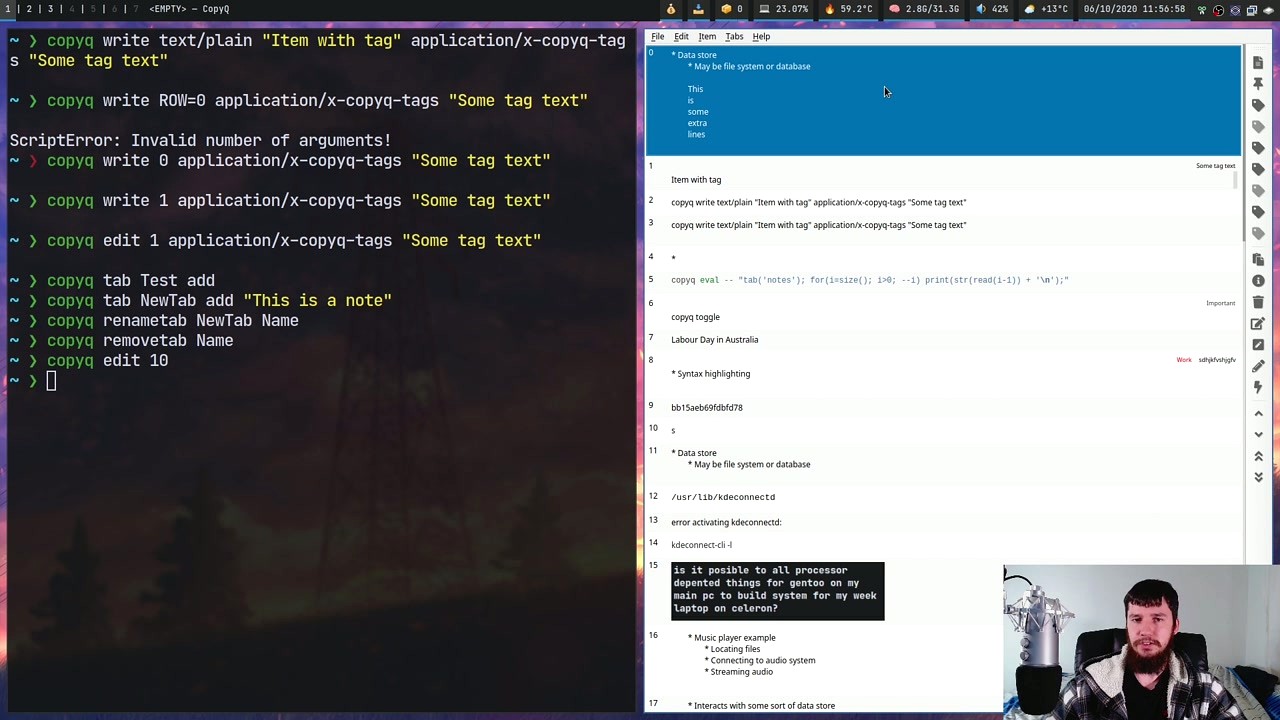
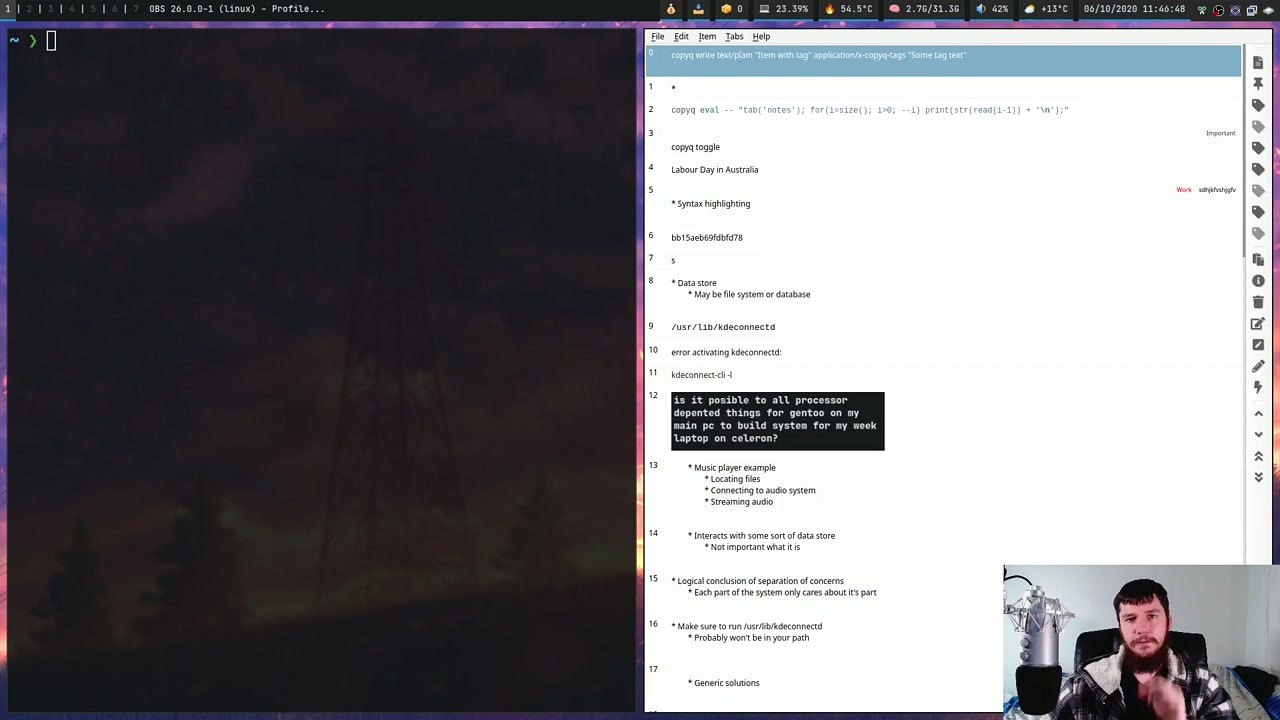
- Command-line interface – CopyQ has a full CLI. Run
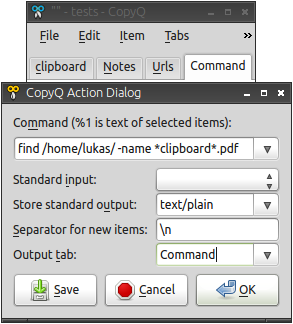
copyq read 0to print the most recent clipboard item,copyq insert 0 "text"to add an item, orcopyq eval "tab('notes')"to switch tabs from a script. This opens up automation possibilities with shell scripts and task schedulers. - Custom commands – Press F6 to open the Commands dialog. You can write small scripts that run on clipboard items. For example, a command that strips all HTML formatting from pasted text, or one that auto-capitalizes text.
- Tab synchronization – Under Preferences > Items > Synchronize, point a tab to a folder on Dropbox, Google Drive, or any synced directory. The tab’s contents get shared across your machines.
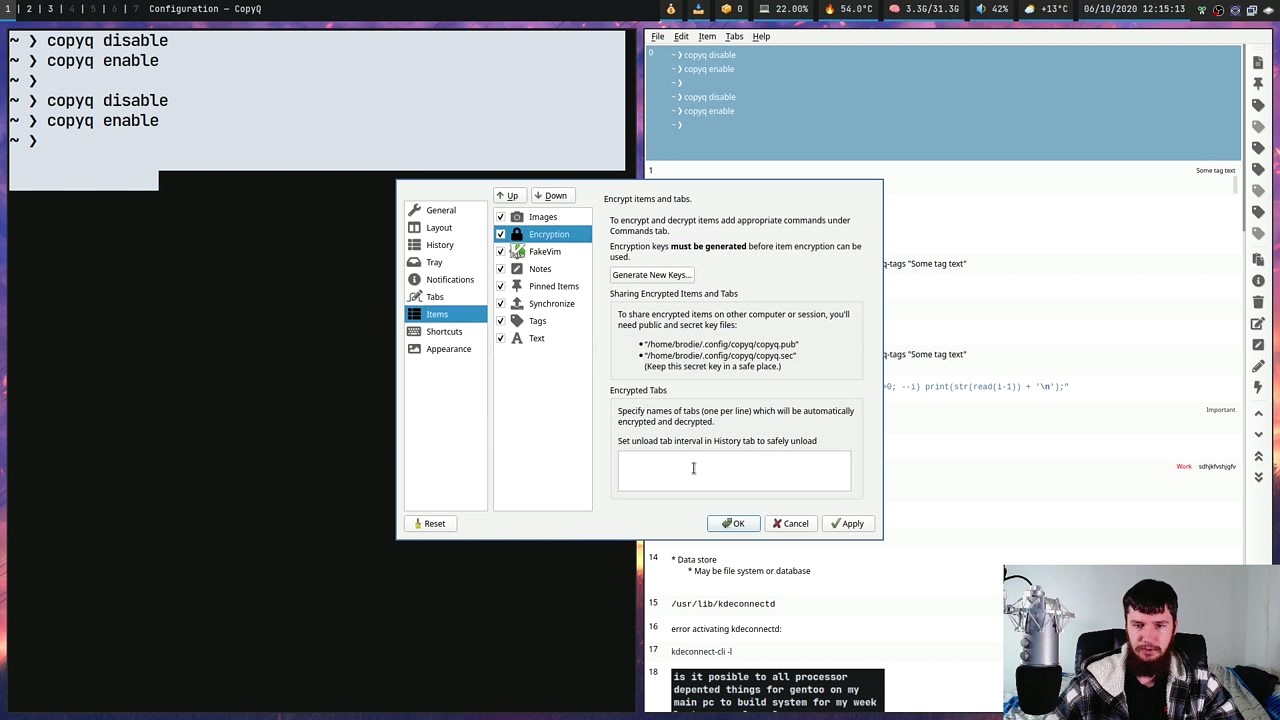
- Encryption – CopyQ can encrypt specific tabs. Go to Preferences > Items > Encryption, generate keys, and specify which tabs to encrypt. Good for storing passwords or sensitive snippets.
Staying updated
CopyQ doesn’t have a built-in auto-updater. Check the GitHub Releases page periodically, or if you installed via a package manager (Homebrew, APT, Chocolatey), your system’s update mechanism handles it. The CopyQ subreddit and the project’s GitHub Issues page are the best places to ask questions or report bugs.
Ready to try it? Download CopyQ and set up your clipboard manager in minutes.
Frequently Asked Questions
Answers to the most common questions about downloading, installing, and using CopyQ clipboard manager on Windows, macOS, and Linux.
Is CopyQ safe to download and use?
Yes, CopyQ is safe to download and use. The software is fully open source under the GNU General Public License v3.0 (GPLv3), which means every line of its source code is publicly available on GitHub for anyone to inspect. The project has been maintained by developer Lukas Holecek since 2009 and has accumulated over 9,000 GitHub stars from the developer community.
CopyQ v13.0.0, the latest release as of October 2025, is distributed through the official GitHub Releases page. The Windows installer (copyq-13.0.0-setup.exe, 18.4 MB) is built through automated CI/CD pipelines on GitHub Actions, meaning the binary you download is compiled directly from the public source code. Major antivirus vendors including Windows Defender, Malwarebytes, and Bitdefender do not flag CopyQ. On Linux, CopyQ is distributed through official package repositories for Ubuntu, Debian, Arch, and Fedora, which run their own security audits before publishing packages.
- Source code is public at github.com/hluk/CopyQ with full commit history
- Binaries are built through GitHub Actions CI/CD pipelines
- Available in official Linux distribution repositories (apt, pacman, dnf)
- No telemetry, no analytics, no data collection of any kind
- Does not require an internet connection to function
Pro tip: If Windows SmartScreen shows a warning on first launch, this is normal for open-source software that has not purchased a code-signing certificate. Click “More info” then “Run anyway” to proceed safely.
For more details about CopyQ’s capabilities, see our features overview.
Is CopyQ free from malware and spyware?
CopyQ is completely free from malware, spyware, adware, and bundled third-party software. The application collects zero user data and makes no network connections during normal operation. Your clipboard data stays entirely on your local machine.
Because CopyQ is open source (GPLv3 license), security researchers and developers worldwide regularly audit its codebase. The GitHub repository has over 400 contributors and forks, which means vulnerabilities get spotted and patched quickly. The 18.4 MB Windows installer contains only the CopyQ application files and Qt runtime libraries needed for the interface. There are no toolbars, browser extensions, or promotional offers bundled into the setup process. During installation on Windows, the only optional choices are the install directory and whether to create a desktop shortcut.
- No internet connection required after download
- No user accounts, registration, or sign-up required
- No advertisements or sponsored content inside the application
- Clipboard data is stored locally in %APPDATA%copyq on Windows or ~/.config/copyq on Linux
Pro tip: A common mistake is downloading CopyQ from unofficial mirror sites that may bundle adware. Always download from the official GitHub Releases page or through our download section to ensure a clean installer.
Check our system requirements to verify CopyQ runs on your setup before downloading.
Where is the official safe download for CopyQ?
The official and safest source for CopyQ is the GitHub Releases page at github.com/hluk/CopyQ/releases, maintained directly by the developer Lukas Holecek. This is where every new version gets published first, and the download files are built by GitHub Actions from the verified source code.
For Windows users, the current release (v13.0.0) offers two download options: the standard installer (copyq-13.0.0-setup.exe at 18.4 MB) and a portable ZIP archive (copyq-13.0.0.zip at 24.4 MB). On macOS, you can install CopyQ through Homebrew by running brew install –cask copyq in Terminal. Linux users can install from their distribution’s package manager: sudo apt install copyq on Ubuntu/Debian, sudo pacman -S copyq on Arch, or sudo dnf install copyq on Fedora.
- Visit the official GitHub Releases page or use our download section
- Select the correct file for your operating system and architecture
- Verify the file size matches the expected values (18.4 MB for Windows installer)
- Run the installer or extract the portable archive to your preferred location
Pro tip: Avoid third-party download aggregator sites like Softonic or CNET Downloads, which sometimes wrap installers with their own bundleware. The GitHub release page and Linux package managers are the only two sources guaranteed to have unmodified binaries.
Once downloaded, follow our Getting Started guide for a detailed installation walkthrough.
Does CopyQ work on Windows 11?
Yes, CopyQ works on Windows 11 without any compatibility issues. Version 13.0.0 is fully tested and compatible with Windows 11 (including 23H2 and 24H2 updates), Windows 10, Windows 8.1, and Windows 7.
CopyQ runs as a system tray application on Windows 11, integrating with the standard notification area. The application supports both light and dark Windows themes, adjusting its tray icon for visibility. Because CopyQ hooks into the Windows clipboard API directly, it captures everything you copy from any application, including text, images, HTML content, URLs, and file paths. The 18.4 MB installer works on both 64-bit and 32-bit Windows systems. On Windows 11 ARM devices like the Surface Pro X, CopyQ runs through the x86 emulation layer without problems.
- Full support for Windows 11 23H2 and 24H2
- Works alongside Windows 11’s built-in clipboard history (Win+V)
- System tray integration with light and dark theme support
- Auto-start on login through the Windows startup registry or Preferences setting
- Works with virtual desktops and snap layouts
Pro tip: If you use both CopyQ and Windows 11’s built-in clipboard history (Win+V), they work simultaneously without conflicts. CopyQ stores its own separate history, giving you a much more powerful search and organization layer on top of what Windows provides natively.
See our system requirements section for the full list of supported configurations.
Is CopyQ compatible with macOS and Linux?
CopyQ is cross-platform and runs natively on macOS (10.15 Catalina and later) and all major Linux distributions. This is one of its biggest advantages over Windows-only alternatives like Ditto.
On macOS, CopyQ requires granting Accessibility permissions in System Preferences for clipboard monitoring to function. Install through Homebrew (brew install –cask copyq) or download the DMG from GitHub Releases. After installing on macOS Sonoma or Ventura, go to System Settings, then Privacy & Security, then Accessibility, and add CopyQ to the allowed list. Without this step, CopyQ cannot detect clipboard changes. On Linux, CopyQ supports both X11 and Wayland display servers, though Wayland requires running with the QT_QPA_PLATFORM=xcb environment variable for full clipboard access. Most distributions include CopyQ in their official repositories.
- macOS: 10.15 Catalina through macOS 15 Sequoia, Intel and Apple Silicon (M1/M2/M3/M4)
- Ubuntu/Debian:
sudo apt install copyq - Arch Linux:
sudo pacman -S copyq - Fedora:
sudo dnf install copyq - Flatpak: Available on Flathub for distribution-independent installs
Pro tip: On Linux with Wayland (Ubuntu 22.04+, Fedora 36+), edit your CopyQ desktop autostart file to include env QT_QPA_PLATFORM=xcb before the command. This forces CopyQ to use XWayland, which solves most clipboard monitoring and shortcut issues.
Check our download section for platform-specific download links and installation commands.
What are the minimum system requirements for CopyQ?
CopyQ is a lightweight application that runs on nearly any modern computer. It requires very little processing power, RAM, or disk space compared to most productivity tools.
The application itself uses approximately 30-50 MB of RAM during normal operation, increasing slightly as your clipboard history grows. The Windows installer is 18.4 MB, and the installed footprint is around 60 MB including Qt runtime libraries. CopyQ does not use the GPU and has no display resolution requirements beyond a standard desktop. On Linux, CopyQ depends on Qt 5 or Qt 6 libraries, which are typically pre-installed on desktop distributions. The CPU impact is negligible since CopyQ only activates briefly when a clipboard change is detected, then returns to idle.
- Operating System: Windows 7/8/10/11, macOS 10.15+, Linux (kernel 4.x or later)
- Processor: Any x86 or x64 CPU from the last 15 years (1 GHz minimum)
- RAM: 512 MB minimum system RAM (CopyQ uses 30-50 MB at runtime)
- Disk Space: 100 MB free (60 MB installed + room for clipboard data)
- Dependencies: Qt 5 or Qt 6 runtime (bundled on Windows and macOS, available via package manager on Linux)
Pro tip: If you store thousands of clipboard items with images, the data folder (%APPDATA%copyq on Windows) can grow to several hundred megabytes. Set a maximum item count in Preferences > Items to keep storage predictable. A limit of 500-1000 items works well for most users.
Visit our system requirements section for a detailed breakdown by platform.
Is CopyQ completely free to download and use?
Yes, CopyQ is 100% free to download, install, and use with no restrictions. There is no trial period, no freemium tier, no premium upgrade, and no paid features hidden behind a paywall. Every single feature is available to every user at zero cost.
CopyQ is released under the GNU General Public License v3.0 (GPLv3), one of the most widely used open-source licenses. This license guarantees that CopyQ will remain free forever and that anyone can view, modify, and redistribute the source code. The developer Lukas Holecek maintains the project on GitHub and accepts contributions from the community. Unlike commercial clipboard managers such as ClipboardFusion (which charges $15 for its full version) or Paste for macOS ($3.99/month subscription), CopyQ gives you unlimited clipboard history, scripting, tab organization, and every other feature at no cost.
- No purchase required, no license key needed
- No time-limited trial or feature restrictions
- No subscription fees or recurring charges
- Free for personal and commercial use
- Source code available for custom modifications under GPLv3
Pro tip: If CopyQ saves you time (and it will), consider sponsoring the developer on GitHub or contributing bug reports and translations. Open-source projects depend on community support to keep going.
Ready to get started? Head to our download section to grab the latest version.
Is there a paid or premium version of CopyQ?
No, there is no paid or premium version of CopyQ. The application is purely open source with a single edition that includes all features. What you download is the complete product.
Some users expect a “Pro” tier because many competing clipboard managers follow that model. ClipboardFusion offers a free version with limited features and a $15 paid upgrade. 1Clipboard and Clipboard Master have similar freemium structures. CopyQ breaks from that pattern entirely. The scripting engine, custom commands, tab organization, keyboard shortcuts, theme customization, and plugin system are all included in the free download. The GPLv3 license actually prevents anyone from creating a proprietary fork, so there will never be a “CopyQ Pro” or “CopyQ Enterprise” edition.
- Single edition with all features unlocked
- GPLv3 license legally prevents proprietary forks
- No ads, no upsell prompts, no feature gates
- Commercial clipboard managers charging $10-30 do not offer meaningfully more functionality
Pro tip: If you need a feature CopyQ does not have, check the GitHub Issues page where feature requests are tracked. You can also write custom commands using CopyQ’s built-in scripting engine to extend functionality yourself.
Explore the full list of what you get for free in our features section.
How do I download and install CopyQ step by step?
Installing CopyQ takes about two minutes on Windows. Download the 18.4 MB installer from our download section, run it, and CopyQ starts working immediately after setup completes.
The installer uses the standard Windows setup wizard with minimal configuration needed. CopyQ v13.0.0 supports Windows 7 through Windows 11. The installation directory defaults to C:Program FilesCopyQ and requires approximately 60 MB of disk space. No additional runtime or framework installations are needed because the Qt libraries are bundled with the installer.
- Go to our download section and click “Download CopyQ” to get the Windows installer (copyq-13.0.0-setup.exe, 18.4 MB)
- Run the downloaded .exe file. If Windows SmartScreen appears, click “More info” then “Run anyway”
- Accept the license agreement (GPLv3) and choose your install directory (default is fine for most users)
- Select whether to create a desktop shortcut and Start Menu entry, then click “Install”
- Once installation completes, check “Launch CopyQ” and click “Finish”
- CopyQ appears as a clipboard icon in your system tray. Copy any text to see it captured automatically
Pro tip: After first launch, open Preferences (Ctrl+P) and enable “Autostart” under the General tab so CopyQ starts automatically when you log in to Windows. Also enable “Paste to current window” under the History tab for one-click pasting.
For a more detailed walkthrough with configuration tips, see our Getting Started guide.
CopyQ portable vs installer – which version should I choose?
Choose the standard installer if you want CopyQ on a single computer with auto-start support. Choose the portable version if you want to run CopyQ from a USB drive or keep it isolated from your system registry.
The Windows installer (18.4 MB) registers CopyQ with the system, adds it to the Start Menu, and lets you configure auto-start on login through the Preferences panel. It stores configuration and clipboard data in %APPDATA%copyq. The portable ZIP archive (24.4 MB, slightly larger because it includes the full directory structure) runs entirely from its extracted folder with no registry entries or system modifications. Portable mode stores all data alongside the executable, making it ideal for USB drives or shared computers.
- Installer (18.4 MB): Best for daily use on your own PC. Includes auto-start, Start Menu entry, uninstaller, and system-wide file associations
- Portable (24.4 MB): Best for USB drives, testing, or locked-down corporate machines where you cannot install software. No admin rights required to run
- Both versions are functionally identical with the same features and performance
- You can switch between them without losing data by copying the configuration folder
Pro tip: If you use the portable version on a USB drive, create a batch file that launches CopyQ with the –session portable flag. This keeps multiple portable sessions separate and prevents conflicts if you plug the drive into different computers.
Download either version from our download section.
How to fix CopyQ installation errors on Windows?
Most CopyQ installation errors on Windows fall into three categories: SmartScreen blocking, antivirus interference, or leftover files from a previous installation. All three are straightforward to resolve.
The most common issue is Windows SmartScreen blocking the installer because CopyQ is not signed with a commercial code-signing certificate (those cost $200-400 per year, which is impractical for a free, open-source project). This is a SmartScreen limitation, not a safety concern. Antivirus false positives happen occasionally with newer releases before virus definition databases update. If you had a previous CopyQ installation that was not fully removed, leftover registry entries or locked config files can cause the new installer to fail.
- SmartScreen block: Click “More info” on the SmartScreen dialog, then “Run anyway.” This is normal for unsigned open-source software
- Antivirus interference: Temporarily disable real-time scanning, install CopyQ, then re-enable scanning. Add C:Program FilesCopyQ to your antivirus exclusion list
- Previous install conflicts: Use Windows “Add or Remove Programs” to uninstall the old version first. Then delete %APPDATA%copyq to clear old configuration data
- “Access denied” errors: Right-click the installer and select “Run as administrator”
- Missing DLL errors: Install the Visual C++ Redistributable 2015-2022 from Microsoft, which provides runtime libraries CopyQ depends on
Pro tip: If the installer keeps failing, use the portable ZIP version instead. It requires no installation at all and works identically to the installed version. Extract it to any folder and run copyq.exe directly.
For a complete setup walkthrough, see our Getting Started guide.
How to fix CopyQ not saving clipboard items?
If CopyQ stops capturing clipboard items, the most likely cause is that clipboard storing has been accidentally disabled, or (on Linux) a Wayland session is blocking clipboard access. Both have quick fixes.
CopyQ has a built-in toggle to pause clipboard monitoring. Check if it is active by right-clicking the system tray icon and looking for “Disable Clipboard Storing” (Ctrl+Shift+X shortcut). If this is checked, CopyQ is ignoring all clipboard changes. On Linux running Wayland (default on Ubuntu 22.04+, Fedora 36+, and GNOME 42+), CopyQ cannot access the clipboard directly because Wayland restricts inter-application clipboard access for security reasons. Some Windows applications using custom clipboard formats may also fail to register with CopyQ.
- Check clipboard storing: Right-click the CopyQ tray icon. If you see “Enable Clipboard Storing,” click it to re-enable monitoring
- Restart CopyQ: Close CopyQ completely from the tray menu, then relaunch it. A restart clears temporary clipboard hook issues
- Linux Wayland fix: Run CopyQ with env QT_QPA_PLATFORM=xcb copyq to use XWayland instead of native Wayland. Edit your autostart desktop file to make this permanent
- Windows clipboard reset: Open Command Prompt as administrator and run echo off | clip to clear the clipboard, then copy something new. This resets the clipboard chain
- Check Preferences: Go to Preferences > Items and verify that the content types you need (text, HTML, images) are enabled for storage
Pro tip: Enable debug logging with COPYQ_LOG_LEVEL=DEBUG environment variable, then check File > Show Log to identify exactly why items are not being captured.
Learn more about configuring CopyQ properly in our Getting Started guide.
Why are CopyQ global shortcuts not working?
Global shortcuts in CopyQ can fail when another application has already registered the same key combination, or when running under Wayland on Linux where global hotkey registration is restricted by the display server.
On Windows, the most common conflict is with other clipboard tools, screen capture software, or gaming overlays that grab key combinations like Ctrl+Alt+V or Ctrl+Shift+C before CopyQ can register them. On Linux with Wayland, applications cannot register global shortcuts directly because the Wayland protocol does not support it for security reasons. GNOME, KDE Plasma, and other desktop environments each handle this differently. XFCE session managers have a known issue (GitHub #3145) where they sometimes kill CopyQ during logout, which corrupts shortcut registrations.
- Check for conflicts: Open CopyQ Preferences > Shortcuts and look for any shortcuts marked with a warning icon. Try assigning a different key combination
- Windows fix: Close other clipboard or screen capture tools temporarily, then restart CopyQ. If the shortcut works, the other application was conflicting
- Linux Wayland fix: Instead of registering shortcuts in CopyQ, create a custom shortcut in your desktop environment settings (GNOME Settings > Keyboard > Custom Shortcuts) that runs the command copyq toggle()
- Reset shortcuts: In CopyQ, go to File > Preferences > Shortcuts, click “Reset” to restore defaults, then re-assign your preferred keys
- Run as admin (Windows): If CopyQ runs as a normal user but the target application runs elevated, the shortcut cannot reach it. Run CopyQ as administrator to match
Pro tip: The F6 key inside CopyQ opens the command dialog where you can test scripting commands like toggle() or showAt(). Use this to verify that CopyQ itself is responding before troubleshooting the shortcut registration.
For shortcut setup details, see our Getting Started guide.
CopyQ stopped working after a Windows update – how to fix?
Windows updates occasionally reset clipboard API hooks, which can cause CopyQ to stop capturing new items or fail to launch. Reinstalling or restarting CopyQ almost always resolves this.
Major Windows updates (like version upgrades from 23H2 to 24H2) rebuild system components that clipboard managers depend on. The update can reset file associations, remove startup registry entries, or clear accessibility permissions. CopyQ’s autostart entry in the Windows registry may be removed by aggressive update processes. In rarer cases, the update may install a newer version of the Visual C++ runtime that creates a library mismatch until CopyQ is reinstalled against the new runtime.
- Quick fix: Close CopyQ from the system tray, then relaunch it from the Start Menu. This re-registers the clipboard hooks with the updated Windows subsystem
- Check autostart: Open CopyQ Preferences > General and verify “Autostart” is still enabled. Windows updates can remove third-party startup entries
- Reinstall if needed: Download the latest version from our download section and install over the existing copy. Your clipboard history and settings in %APPDATA%copyq are preserved
- Verify tray icon: If the tray icon disappeared, check “Hidden icons” in the Windows taskbar. Windows may have moved CopyQ to the overflow area after the update
Pro tip: Before major Windows updates, export your CopyQ data through File > Export. This creates a backup of all tabs, items, and settings that you can restore if anything goes wrong. The export file is typically 1-5 MB depending on your history size.
Check our system requirements to verify your updated Windows version is supported.
How do I update CopyQ to the latest version?
CopyQ does not have a built-in auto-updater, so you need to download and install new versions manually. The process takes about two minutes and preserves all your clipboard history and settings.
On Windows, download the latest installer from our download section or the GitHub Releases page and run it. The new version installs over the old one automatically without removing your data. Your clipboard history, tabs, custom commands, and preferences are stored in %APPDATA%copyq, which the installer does not touch. On Linux, updating depends on your package manager: sudo apt update && sudo apt upgrade copyq on Ubuntu, sudo pacman -Syu copyq on Arch, or sudo dnf upgrade copyq on Fedora. On macOS with Homebrew, run brew upgrade copyq.
- Check your current version: open CopyQ, go to Help > About, and note the version number
- Visit our download section to see the latest available version (currently v13.0.0)
- Download the installer for your platform and run it
- Restart CopyQ after installation completes
- Verify the update by checking Help > About again
Pro tip: Subscribe to the CopyQ GitHub repository’s releases (click “Watch” then “Custom” then check “Releases”) to get an email notification whenever a new version is published. Major releases happen every few months.
See our features section for what the latest version offers.
What is new in CopyQ v13.0.0?
CopyQ v13.0.0 was released on October 22, 2025, and is the latest stable version. This release focused on improved Wayland support on Linux, performance improvements for large clipboard histories, and several bug fixes reported by the community.
The v13 release cycle addressed some of the most-requested issues from GitHub, including better handling of pinned items (fixing issue #3147 where pinned items could be overwritten), reduced memory usage when storing image-heavy clipboard histories, and improved compatibility with Qt 6 on newer Linux distributions. The Windows build now bundles updated Qt 6.6 libraries, which improve rendering on high-DPI displays and resolve some font smoothing issues that affected earlier versions. The macOS build includes fixes for Accessibility permission prompts that appeared repeatedly after system updates on macOS Sonoma and Ventura.
- Improved Wayland clipboard monitoring on GNOME 45+ and KDE Plasma 6
- Fixed pinned items being overwritten in certain scenarios (GitHub #3147)
- Reduced memory usage with large image-containing clipboard histories
- Updated Qt 6.6 runtime for Windows with better high-DPI support
- Fixed macOS Accessibility permission re-prompt issue after system updates
- Performance improvements for the search/filter function with 1000+ items
Pro tip: Read the full changelog on the GitHub Releases page before updating. If you rely on custom scripts or commands, test them with the new version in the portable edition first before updating your main installation.
Download the latest version from our download section.
CopyQ vs Ditto – which clipboard manager is better?
Both CopyQ and Ditto are excellent free, open-source clipboard managers, but they serve different user profiles. Ditto is simpler and focused on Windows, while CopyQ is more powerful and works across Windows, macOS, and Linux.
Ditto is the most popular Windows clipboard manager according to Slant and AlternativeTo community rankings. It has a clean interface, fast search, and easy setup that appeals to users who want a straightforward clipboard history without complexity. CopyQ targets power users who want programmable clipboard workflows. Its built-in scripting engine lets you write JavaScript-like commands that transform, filter, or route clipboard items automatically. CopyQ also supports tabbed organization, item notes, and custom MIME type handling that Ditto does not offer.
- Cross-platform: CopyQ runs on Windows, macOS, and Linux. Ditto is Windows-only
- Scripting: CopyQ has a full scripting engine for automation. Ditto has no scripting support
- Tab organization: CopyQ supports multiple tabs for categorizing items. Ditto uses a flat list with groups
- Learning curve: Ditto is easier to pick up. CopyQ has more settings and features to configure
- Network sync: Ditto supports LAN clipboard sharing between computers. CopyQ supports file-based sync through shared folders (Dropbox, network drives)
- Resource usage: Both use 30-50 MB RAM. Ditto has a slightly smaller installer at 9 MB vs CopyQ’s 18.4 MB
Pro tip: If you only use Windows and want something quick, Ditto is a great choice. If you work across operating systems or want to automate clipboard workflows with scripts, CopyQ is the better pick. Many power users on Reddit recommend trying both for a week before deciding.
See how CopyQ’s features stack up in our features section.
How do I use CopyQ scripting and custom commands?
CopyQ includes a built-in scripting engine that lets you automate clipboard workflows using a JavaScript-like syntax. You can write custom commands that trigger on clipboard events, transform text, filter content, or connect CopyQ with external tools.
The scripting engine is accessible through the Command dialog (F6 key or from the toolbar). Scripts have access to CopyQ’s full API, including functions to read, write, and manipulate clipboard items, open dialogs, run external programs, and interact with tabs. The command-line interface (copyq command) uses the same scripting engine, so anything you can do in the GUI command dialog also works from terminal scripts, cron jobs, or hotkey tools.
- Open the Command dialog: Press F6 inside CopyQ or go to Commands > New Command from the menu bar
- Write a script: Use built-in functions like read(0) to get the latest clipboard item, copy(text) to set clipboard content, or popup(“title”, “message”) to show notifications
- Set a trigger: Assign the command to run “On clipboard change” for automatic processing, or bind it to a global shortcut for on-demand execution
- Example – auto-uppercase: Create a command with the script copy(str(read(0)).toUpperCase()) and trigger it “On clipboard change” to auto-capitalize everything you copy
- Share commands: Export commands from Commands > Export and share the .ini file with others, or import community-created commands from the CopyQ GitHub wiki
Pro tip: The CopyQ GitHub wiki has a “Command Examples” page with dozens of ready-to-use scripts covering tasks like stripping HTML from copied text, auto-saving images to files, translating clipboard text, and filtering duplicate items.
Explore what else CopyQ can do in our features section.
How do I sync CopyQ clipboard history across multiple devices?
CopyQ does not have built-in cloud sync, but you can synchronize clipboard history across multiple computers by pointing CopyQ’s data directory to a shared folder on Dropbox, Google Drive, OneDrive, or a network drive.
CopyQ stores each tab as a separate data file in its configuration directory. On Windows, this is %APPDATA%copyq. On Linux, it is ~/.config/copyq. By changing this path to a cloud-synced folder, any clipboard item saved on one machine appears on all others running CopyQ with the same sync target. The sync is file-based and works with any file synchronization service. Some users on the Zorin OS forum reported path issues when using /run/user/1000 as a sync target on Linux, so stick to standard home directory paths.
- Create a sync folder: Make a folder like Dropbox/CopyQ-Sync or OneDrive/CopyQ-Data
- Configure CopyQ: Open Preferences > Items, find the “Tab Items” section, and change the data directory path to your sync folder
- Repeat on other machines: Install CopyQ on each computer and point them all to the same sync folder
- Handle conflicts: Avoid copying on two machines simultaneously, as file sync services may create conflict copies. Close CopyQ on one machine before opening it on another for cleanest results
Pro tip: For a more reliable multi-device setup, use CopyQ’s File > Export/Import feature on a schedule instead of live sync. Export your clipboard data to a shared folder daily, and import it on other machines when needed. This avoids the file-locking conflicts that live sync can create.
Learn how to set up CopyQ from scratch in our Getting Started guide.
Still have questions? Check the official CopyQ documentation or browse the GitHub Discussions community.